Are you dealing with a pesky termite infestation in your concrete structures? Look no further! In this ultimate guide, we will walk you through the step-by-step process of drilling holes in concrete for termite treatment. From obtaining the right tools to executing the technique with precision, you will gain all the knowledge you need to effectively eradicate those unwanted guests. Say goodbye to termites and hello to a termite-free environment that will last for years to come. Let’s get started!

Understanding Termites and Their Habitats
Termites are small, social insects that belong to the order Isoptera. They are known for their ability to cause extensive damage to wooden structures and furniture. Understanding the characteristics of termites is essential when dealing with termite infestations.
Characteristics of termites
Termites have several unique characteristics that distinguish them from other insects. They have straight antennae, a straight waist, and soft bodies. Termites are eusocial insects, meaning they live in large colonies and have different castes, such as workers, soldiers, and reproductive individuals. They feed on cellulose, which is found in plant matter and wooden structures.
Common types of termites
There are three main types of termites that are commonly found: subterranean termites, drywood termites, and dampwood termites. Subterranean termites build colonies underground and construct mud tubes to access their food sources. Drywood termites infest dry wood and can survive without contact with soil. Dampwood termites, on the other hand, infest wood that has high moisture content.
Termite habitats and feeding conditions
Termites can thrive in a variety of habitats, depending on the species. Subterranean termites prefer moist environments and construct their colonies in soil. Drywood termites, as the name suggests, infest dry wood materials. Dampwood termites are typically found in areas with excessive moisture, such as basements or crawl spaces. For termites to survive, they require a combination of suitable temperature, moisture, and food sources.
Signs of termite infestation
Identifying the signs of termite infestation is crucial for early detection and treatment. Some common signs include the presence of mud tubes or tunnels near wooden structures, discarded wings, hollow-sounding wood, and small piles of frass, which is termite excrement. If you notice any of these signs, it is important to take immediate action to prevent further damage.
Overview of Termite Treatment
Termite treatment involves various methods to control and eliminate termite infestations. Understanding the different treatment options is essential to choose the most effective approach for your specific situation.
Chemical barriers and their functions
Chemical barriers involve the application of termite control products around the perimeter of a structure. These barriers create a protective zone, preventing termites from entering the building. The chemicals used can either repel termites or kill them upon contact. Chemical barriers can be applied during the construction phase or as a remedial treatment for existing infestations.
Non-chemical treatments
Non-chemical treatments are alternative solutions for termite control, particularly for individuals who prefer environmentally friendly options. Non-chemical treatments may include physical barriers, such as stainless steel mesh or sand, that prevent termites from accessing the building. Other methods involve the use of natural substances, such as orange oil or nematodes, to repel or kill termites.
Preventive measures against termite infestation
Prevention is always better than cure when it comes to termite infestations. Taking proactive measures can greatly reduce the risk of termite damage. Some preventive steps include regular inspection of wooden structures, maintaining proper ventilation and drainage, removing sources of excessive moisture, and sealing any gaps or cracks that may serve as entry points for termites.
Importance of professional termite treatment
While DIY termite treatment options exist, it is highly recommended to seek professional assistance for termite control. Professionals have the expertise, experience, and access to specialized equipment and products to effectively eliminate termites. They can accurately assess the severity of the infestation, choose the most appropriate treatment method, and ensure long-term protection against future infestations.

Why Drill Holes in Concrete for Termite Treatment
When it comes to termite treatment, drilling holes in concrete may be necessary to effectively target and eliminate termite colonies. Soil treatment is a common method used to control subterranean termites, and drilling holes in concrete allows access to the soil beneath the structure.
Concept of soil treatment for termite control
Soil treatment involves applying termiticides to the soil around a building’s foundation. Termites commonly travel through the soil to access the structure. By treating the soil, termiticides create a protective barrier, preventing termites from reaching the building. Drilling holes in concrete provides access to the soil for the application of termiticides.
Reasons for drilling holes in concrete
Drilling holes in concrete allows for precise application of termiticides. Concrete obstacles, such as foundations or flooring, can block the termiticides from reaching the soil. By drilling holes, professionals can bypass these obstacles and deliver the treatment directly to the soil, increasing its effectiveness. This method ensures that the termiticides reach the areas where termites are likely to travel.
Benefits of concrete drilling in termite treatment
Drilling holes in concrete offers several benefits for termite treatment. Firstly, it allows for efficient and targeted application of termiticides, maximizing their effectiveness. Secondly, it provides access to the areas beneath the structure where termites may be hiding or traveling. Lastly, concrete drilling allows professionals to accurately measure the depth and diameter of the holes, ensuring the appropriate amount of termiticide is applied.
Preparing for Drilling
Before drilling holes in concrete, it is important to gather the necessary materials and ensure safety during the drilling operation.
Materials and equipment needed
To successfully drill holes in concrete for termite treatment, you will need a hammer drill or rotary hammer, drill bits suitable for concrete, safety goggles, ear protection, a dust mask, and a tape measure. It is also essential to have the appropriate termiticide and equipment for its application, such as a sprayer or injector.
Safety during drilling operation
Drilling can generate a significant amount of dust and noise, so it is important to take safety precautions. Wear safety goggles to protect your eyes from debris, ear protection to minimize noise-induced hearing damage, and a dust mask to prevent inhalation of dust particles. It is also advisable to wear appropriate clothing and footwear to ensure you are protected during the drilling process.
Determining the drilling area
Identifying the areas where termite treatment is required is crucial before drilling holes. Consult with a professional to determine the optimal drilling locations based on the severity of the infestation and the layout of the structure. The drilling spots should be marked accurately to ensure the termiticide is applied to the targeted areas effectively.

Step-by-Step Guide to Drilling Holes in Concrete
Drilling holes in concrete for termite treatment requires a systematic approach to ensure the proper application of termiticides.
How to mark the drilling spots
Using a tape measure and a marker, mark the drilling spots according to the professional’s recommendations. Typically, the spots are marked along the perimeter of the structure, focusing on areas where termites are likely to enter or travel. The marks should be clear and easily visible during the drilling process.
Correct drilling technique
Start by selecting the appropriate drill bit for the concrete. Attach the drill bit securely to the hammer drill or rotary hammer. Position the drill bit at a 90-degree angle to the concrete surface and apply a steady pressure to start the drilling process. Use a slow drilling speed to maintain control and avoid damaging the drill bit or the concrete. Continue drilling until the desired depth is reached.
Depth and diameter of holes
The depth and diameter of the holes may vary depending on the treatment requirements and the recommendations of the professional. Typically, the holes should be drilled to a depth that reaches the soil beneath the concrete surface, allowing for the application of termiticides. The diameter of the holes should accommodate the termiticide injection equipment, ensuring even distribution of the treatment.
Follow-up steps after drilling
After drilling the holes, it is crucial to follow up with the application of termiticides. Consult with a professional to determine the appropriate termiticides for your specific situation and comply with the manufacturer’s instructions for their application. Ensure that the termiticides are applied evenly and reach the soil as intended. A thorough and accurate application is essential for effective termite control.
Choosing the Right Drilling Equipment
Selecting the right drilling equipment is crucial to ensure smooth and efficient drilling operations.
Types of drilling machines for concrete
When drilling holes in concrete, hammer drills or rotary hammers are commonly used. Hammer drills are designed for light to medium-duty drilling, while rotary hammers are suitable for heavy-duty drilling. Consider the size and scale of your termite treatment project to determine the appropriate drilling machine for your needs.
Selecting drill bits suitable for concrete
To effectively drill holes in concrete, it is important to select drill bits that are specifically designed for concrete. Carbide-tipped masonry drill bits are commonly used for this purpose. These drill bits are durable and can withstand the abrasive nature of concrete. Choose the appropriate size and type of drill bit based on the drilling requirements of your termite treatment project.
Maintenance of drilling equipment
Proper maintenance of drilling equipment ensures their longevity and optimal performance. After each use, clean the drill bits thoroughly to remove any concrete residue or dust. Inspect the drilling machine regularly for any signs of wear or damage and replace any worn-out parts immediately. Regularly lubricate the drilling machine as recommended by the manufacturer to ensure smooth operation.
Applying Termite Treatment through Drilled Holes
After drilling the holes in concrete, the next step is to apply the termite treatment through these openings.
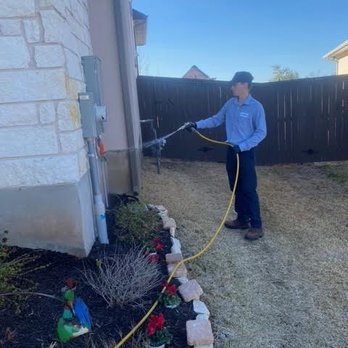
How to apply termite chemicals
Consult with a professional to determine the appropriate termiticide for your termite treatment. Follow the manufacturer’s instructions for dilution and application. Using a sprayer or injector, apply the termiticide evenly into each drilled hole, ensuring the treatment reaches the soil beneath the concrete surface. Take care to maintain a consistent application rate to avoid under or over-treatment.
Risks and precautions in handling termite chemicals
Termiticides contain chemicals that can be harmful if mishandled. It is important to wear personal protective equipment, such as gloves and a mask, when handling termiticides. Follow the safety precautions outlined by the manufacturer, such as avoiding contact with the skin and eyes, and ensure proper ventilation during the application process. Store termiticides in a secure location away from children and pets.
Ensuring even distribution of treatment
To ensure effective termite control, it is essential to achieve even distribution of the termiticide throughout the drilled holes. Take care to inject the termiticide slowly and evenly into each hole, allowing it to reach the surrounding soil. Proper distribution of the treatment ensures that termites encounter the termiticide as they travel through the soil, maximizing its effectiveness in eliminating the infestation.
Post-Treatment Procedures
After applying the termite treatment through the drilled holes, there are certain post-treatment procedures that need to be followed.
Sealing the drilled holes
Once the termiticide has been applied and allowed sufficient time to penetrate the soil, the drilled holes should be sealed. Use an appropriate sealant or cement to fill the holes, ensuring a tight seal. Sealing the holes helps to prevent the entry of moisture, debris, or pests and maintains the structural integrity of the concrete.
Cleanup after termite treatment
After completing the termite treatment, it is important to clean up the drilling area to remove any debris or dust generated during the drilling process. Dispose of any waste materials, such as concrete shavings or empty termiticide containers, safely and in accordance with local regulations. Thoroughly clean and disinfect any tools or equipment used during the drilling operation.
Monitoring for possible re-infestation
Even after termite treatment, it is essential to monitor the treated area for any signs of re-infestation. Regular inspections should be conducted to ensure that termites have not returned or established new colonies. Any suspicious signs, such as mud tubes or damaged wood, should be reported to a professional for further evaluation and necessary action.
Regular maintenance and prevention
To prevent future termite infestations, regular maintenance and preventive measures are crucial. Conduct routine inspections of wooden structures, paying attention to areas susceptible to termite damage. Eliminate sources of excess moisture, such as leaks or poor drainage, to deter termites. Consider implementing preventative treatments, such as chemical barriers or non-chemical alternatives, to create a protective zone against future termite infestations.
Impact of Weather on Drilling and Treatment
Weather conditions can have a significant impact on drilling holes in concrete for termite treatment. It is important to consider the optimal weather conditions for effective treatment.
Optimal weather conditions for drilling
Drilling holes in concrete is best done under dry weather conditions. Rain or excessive moisture can affect the concrete’s integrity, making it challenging to drill precise holes. Dry weather allows for better control and accuracy during the drilling operation. It is advisable to schedule drilling activities during periods of low humidity and minimal chances of rain to ensure optimal results.
Effects of rain and humidity on termite treatment
Rain and humidity can impact the effectiveness of termite treatment. Excessive moisture can dilute or wash away the termiticide, reducing its efficacy. It can also create an environment conducive to termite survival and infestation. Therefore, it is important to take weather conditions into account before applying termite treatment. If rainfall occurs shortly after treatment, extra precautions may be necessary to ensure the treatment remains effective.
Dealing with harsh weather conditions
In some cases, drilling holes in concrete for termite treatment may need to be postponed due to harsh weather conditions. Extreme heat, strong winds, or heavy rain can hinder the drilling process and compromise the treatment. It is advisable to consult with a professional to determine the best course of action in such situations. They can provide guidance on rescheduling the treatment or implementing alternative methods based on the weather forecast.
Professional Help vs DIY
When it comes to termite treatment, the decision between seeking professional help or opting for a DIY approach depends on several factors.
Advantages of DIY termite treatment
DIY termite treatment has some advantages, particularly for small infestations or individuals with experience and knowledge in termite control. It allows you to take immediate action, potentially saving time and money. DIY treatments may also offer greater flexibility and convenience, as you have full control over the application process and treatment schedule.
Reasons to hire professionals
Hiring professionals for termite treatment is highly recommended, especially for large infestations or complex treatment requirements. Professionals have the expertise to accurately assess the extent of the infestation, choose the most effective treatment method, and ensure proper application. They also have access to specialized equipment and products not readily available to the general public. Professional treatments often come with warranties or guarantees, providing peace of mind and long-term protection against future infestations.
Assessing the cost and promises of both options
When deciding between professional help and a DIY approach, it is important to consider the cost and promises of each option. DIY treatments may appear more cost-effective initially, but they often lack the expertise and specialized equipment necessary for effective termite control. Professional treatments may involve higher upfront costs, but they offer the assurance of proper treatment and long-term protection. Assess the severity of the infestation, your budget, and your comfort level with tackling termite control to make an informed decision that best suits your needs.
Your Expert in Animal Control and Extermination. Trust our experience for humane, effective pest management, protecting your property and ensuring peace of mind with Michael S.